E01 Making your first virtual machine

 Back to the Material: Introduction to Data Networks
Video: Instructions for E01
Watch the video below if you have problems.
Example Video: virtual machine adapters, ping & how to draw
Example Video: E01 step-by-step, Exercise done in teaching by the teacher during spring 2022
I explain long and in detail, thus long video but, you can't go wrong with this one. Hopefully. Same video description has time tags for E01 - E05.
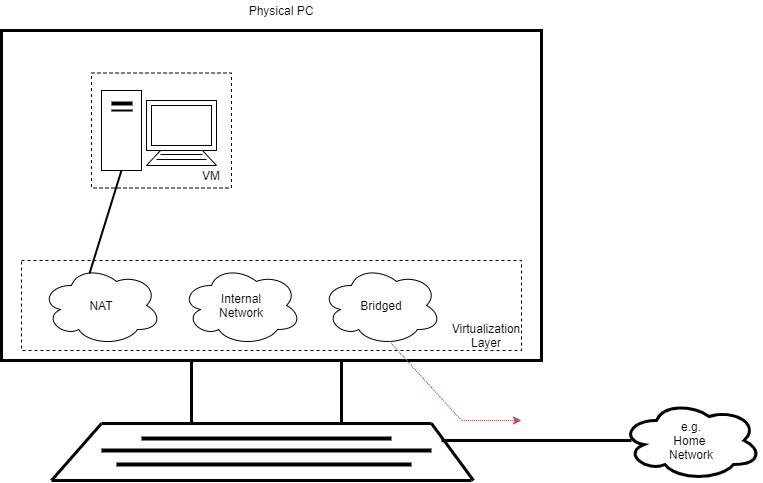
Our goal
Our goal is to have a VM installed, which can be moved to different networks on the virtualization platform.
Needed components
- file of
lubuntu.ova - Host Operating System with a working VirtualBox installation
You can download the virtual machines from this Link!
Documenting the exercises
Info: Exercises should be returned in a Git repository format/link!
Here is the repository -template for returning exercises, please import it to https://gitlab.labranet.jamk.fi (preferrably) to start your exercises.
If git is unfamiliar to you, please join the 1 ECTS course: Git -versionhallinta ja Gitlab -projektien hallintaympäristö - TTZW0410 through Peppi. You'll need the information given in week 2 of that course to start writing documentation in Markdown.
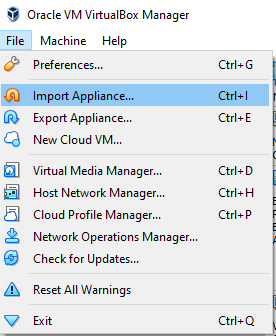
Importing a virtual machine
Import the lubuntu.ova -virtual machine in VirtualBox by selecting File -> Import Appliance...
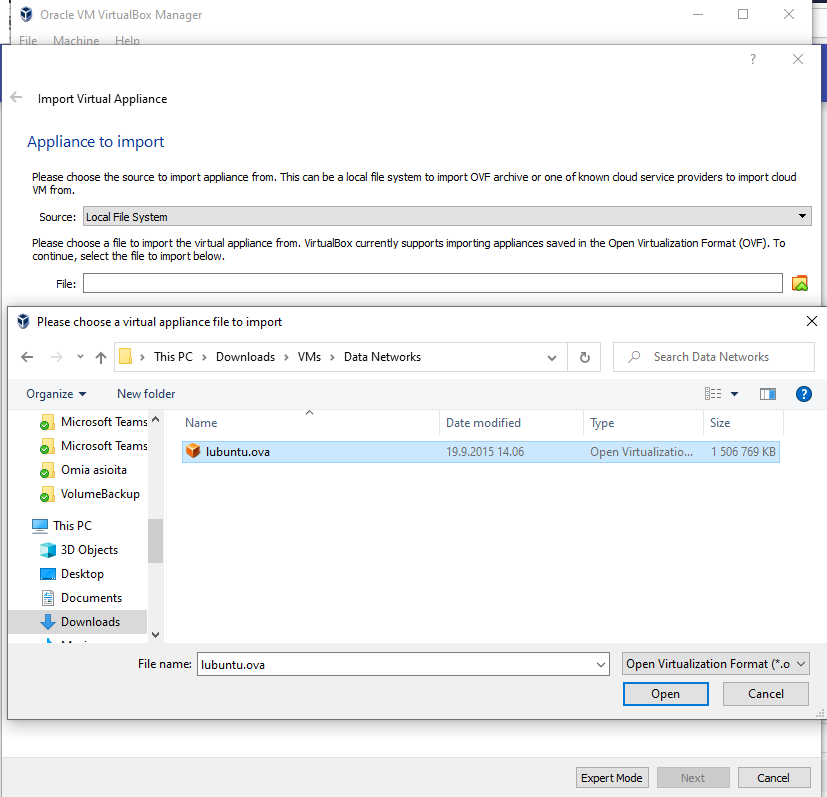
Search for lubuntu.ova in your local hard drive, by pressing the folder icon on the right. Press Open once found and selected.
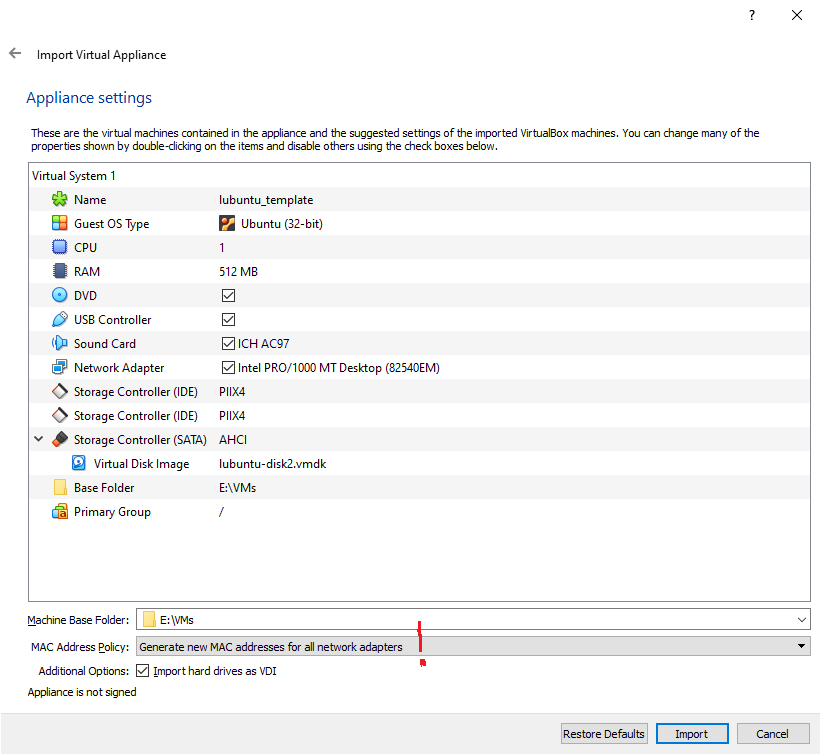
VirtualBox shows you the settings of the selected lubuntu.ova file. Please be aware of the following settings:
- Base Folder: Where the virtual machine will be installed.
- If you are on a LabraNet workstation at JAMK, Be sure that this points to
D:\<studentnumber>-folder
- If you are on a LabraNet workstation at JAMK, Be sure that this points to
- MAC Address Policy:
Generate new MAC addresses for all network adapters- This is important, we don't want MAC address collisions in our local area network
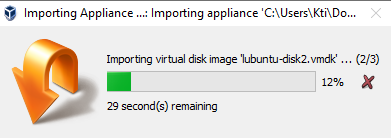
Once done, press Import.
The machine should import itself to your local machine. The lubuntu.ova -file is unnecessary after this, thus you can delete it afterwards to save disk space.
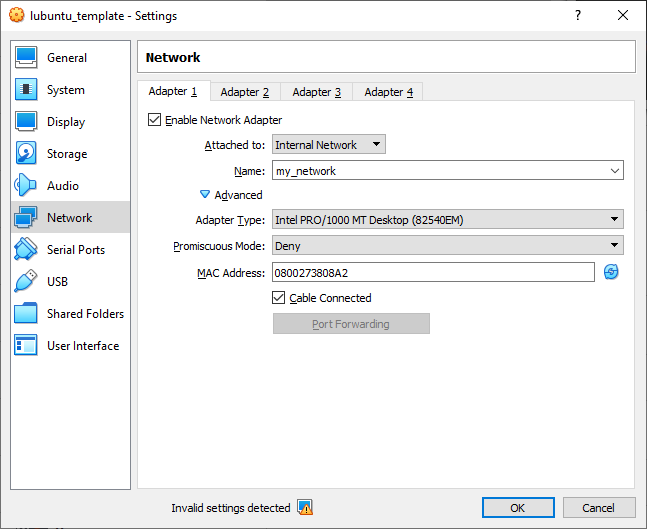
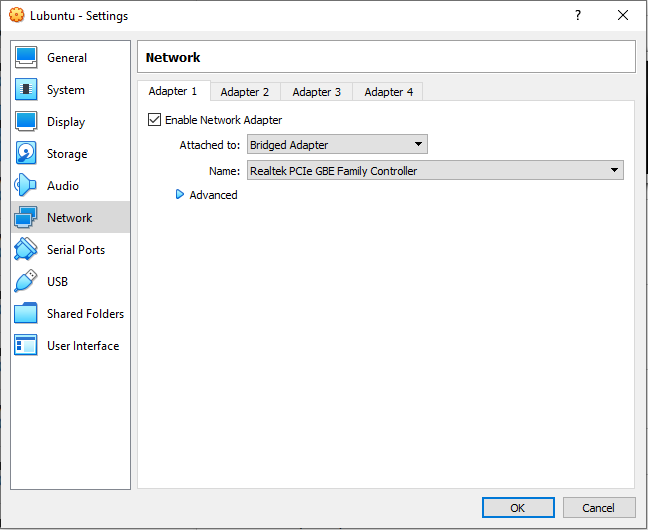
Please check the network settings of the lubuntu virtual machine by going to Settings -> Network -> Adapter 1. Press Advanced.
Assignment: Take a screenshot of your virtual machines network settings
- Write down your MAC-address to
E01.md - Save the screenshot to
/documentation/E01/-folder in the repository- reference the picture file in
E01.md
- reference the picture file in
Info: Screenshot - use a screenshot software to capture the settings
e.g. in windows * Snipping Tool * Snip & Sketch
Save the image to /documentation/E01/ -folder of your repository and reference the file in E01.md with the text . Be precise with the file name & extension (.png or .PNG).
Follow the next steps for network settings.
Network settings of the virtual machine
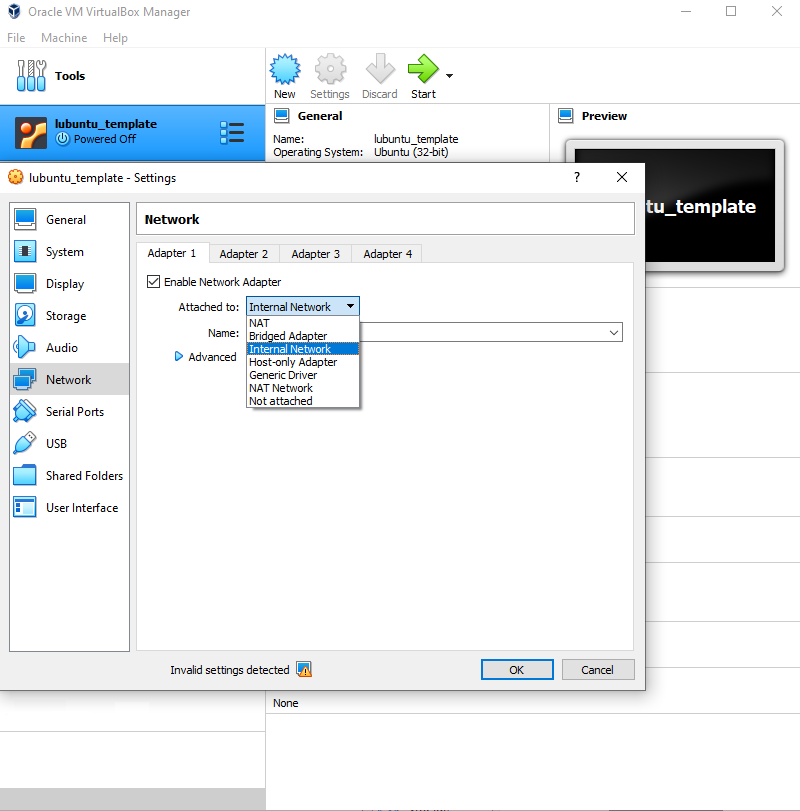
First we start by placing the virtual machine in an Internal Network of VirtualBox.
Internal Network
There is no connectivity. Just the machine.
Leaving the Virtual Machine in the Internal Network
There is no connectivity.
Question: Answer the following questions in your repository's E01.md
- What is this virtual machine useful for without a network connection? What can you do with it?
- Is there anypoint in computers without network connectivity?
- hint: Lookup what Alan Turing did without the Internet
Bridged interface
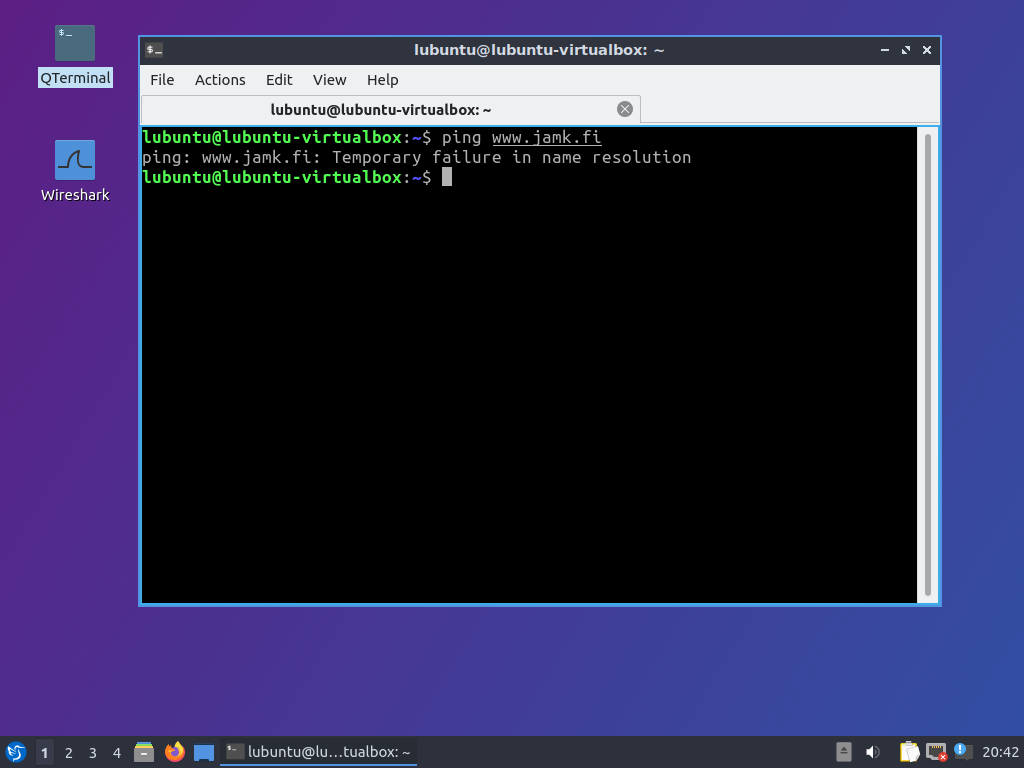
Lets connect the virtual machine to the Internet. Lets change the virtual machine to a Bridged Adapter network.
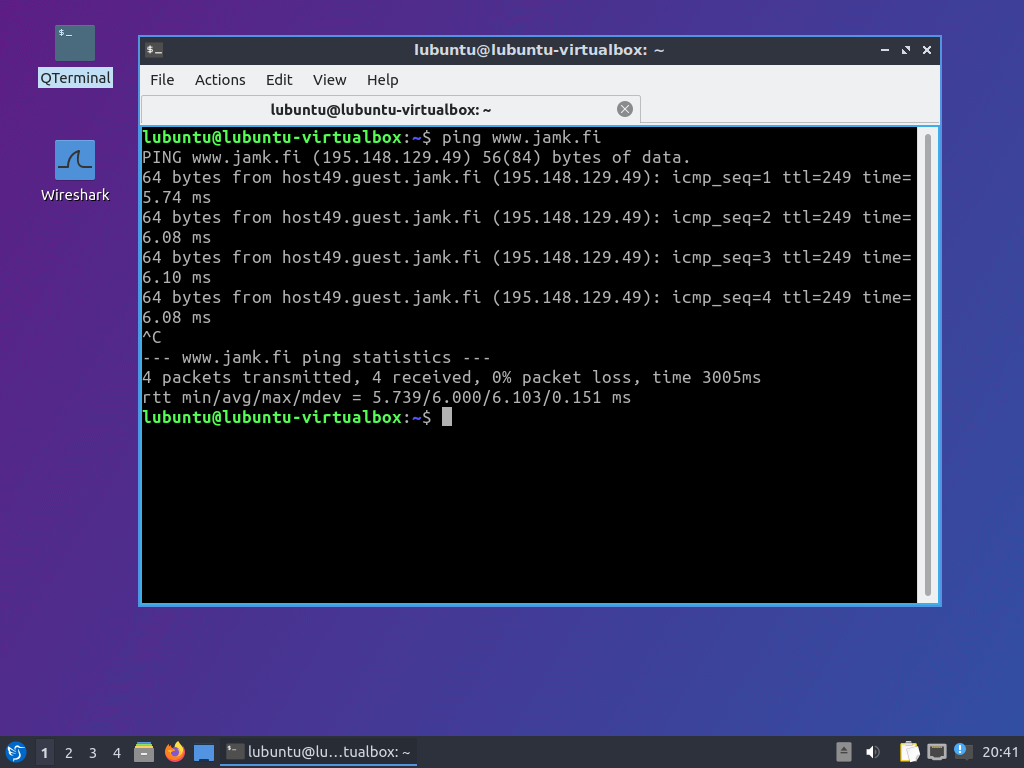
After checking OK and closing the settings we can test for connectivity by writing ping www.jamk.fi.
Info: Just wait a while for the adapter to adjust to the new network
Check the network icon for activity on the bottom right.
You can click it with your left mouse button and select wired connection 1 to force the adapter up/down, if necessary.

Adapters of a Virtual Machine can be changed from one network to another while the virtual machine is ON. This is similar as in connecting from one WLAN to another.
Bug: Eduroam WLAN in JAMK doesn't allow the traffic
- You can change your laptop to connect to your cell phones hotspot
- Physically connect to LabraNet ethernet cable.
How to check connectivity
Ping and traceroute will be your friends on this course.
They are tools (software) to investigate, test and evaluate your network.
Ping
Info: Ping sends packets there and back again
Ping sends ICMP Echo Request to the target host with command ping <Domain Name or IP>
The target host should answer back (if it is responsing) an ICMP Echo Reply
The ping software then measures the time spent between the request and reply. This is called delay between the hosts. Different packets can have different delay, this change between delays is called jitter.
Example of the output:
lubuntu@lubuntu-VirtualBox:~$ ping www.jamk.fi
PING www.jamk.fi (195.148.129.49) 56(84) bytes of data.
64 bytes from host49.guest.jamk.fi (195.148.129.49): icmp_seq=1 ttl=249 time=5.98 ms
64 bytes from host49.guest.jamk.fi (195.148.129.49): icmp_seq=2 ttl=249 time=5.77 ms
64 bytes from host49.guest.jamk.fi (195.148.129.49): icmp_seq=3 ttl=249 time=5.96 ms
64 bytes from host49.guest.jamk.fi (195.148.129.49): icmp_seq=4 ttl=249 time=6.07 ms
64 bytes from host49.guest.jamk.fi (195.148.129.49): icmp_seq=5 ttl=249 time=6.05 ms
^C
--- www.jamk.fi ping statistics ---
5 packets transmitted, 5 received, 0% packet loss, time 4008ms
rtt min/avg/max/mdev = 5.776/5.970/6.075/0.135 ms
!!! question "Assignment: Please ping www.jamk.fi and document the results to E01.md
You can stop the ping with CTRL+C!"
Info: How to document the results?
Info: Copy & Paste - Make sure your clipboard is bidirectional to get the results from the virtual machine
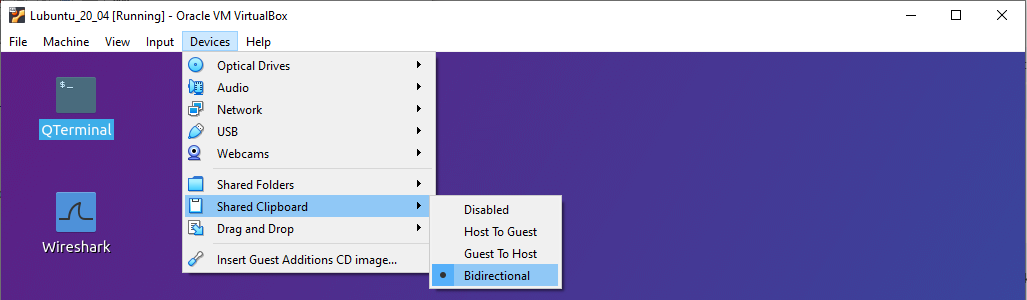
you can then copy&paste from the lubuntu (guest virtual) machine to the host (virtual) machine!
Info: Screenshot - use a screenshot software to capture the ping
e.g. in windows * Snipping Tool * Snip & Sketch
Save the image to /documentation/E01/ -folder of your repository and reference the file in E01.md with the text . Be precise with the file name & extension (.png or .PNG).
www.jamk.fi has been moved to a public cloud in spring of 2022
If you want to test data network traffic within Finland, use the IPv4 address of 195.148.129.49 as the target of your commands. This means you replace www.jamk.fi of the command with 195.148.129.49. E.g.
ping 195.148.129.49- `traceroute 195.148.129.49.
Traceroute
Info: Traceroute pings every hop/intersection of the route as The Journey is sometimes more important than the destination
Traceroute gives each packet a different Time-To-Live value. It is first 1, then 2, then 3. This means how many intersections/hops can there be between the target host and the sending computer.
Each intersection is given a delay of response (similar to ping). Example of the output:
lubuntu@lubuntu-virtualbox:~$ traceroute www.jamk.fi
traceroute to www.jamk.fi (195.148.129.49), 64 hops max
  1   192.168.0.1  0,505ms  0,514ms  0,389ms
  2   139.97.12.223  3,374ms  88.112.138.2  0,783ms  0,827ms
  3   195.140.192.17  3,763ms  139.97.12.223  3,290ms  3,268ms
  4   86.50.255.218  13,612ms  195.140.192.17  3,402ms  3,299ms
  5   86.50.255.161  8,110ms  86.50.255.218  6,171ms  5,781ms
  6   193.166.5.142  6,406ms  86.50.255.161  5,994ms  6,137ms
  7   195.148.129.49  5,710ms  193.166.5.142  6,451ms  5,990ms
lubuntu@lubuntu-virtualbox:~$
Assignment: Use Traceroute
- Do a
traceroute www.jamk.fiand document the results. - Do a
traceroute --resolve-hostnames www.jamk.fiand document the results.
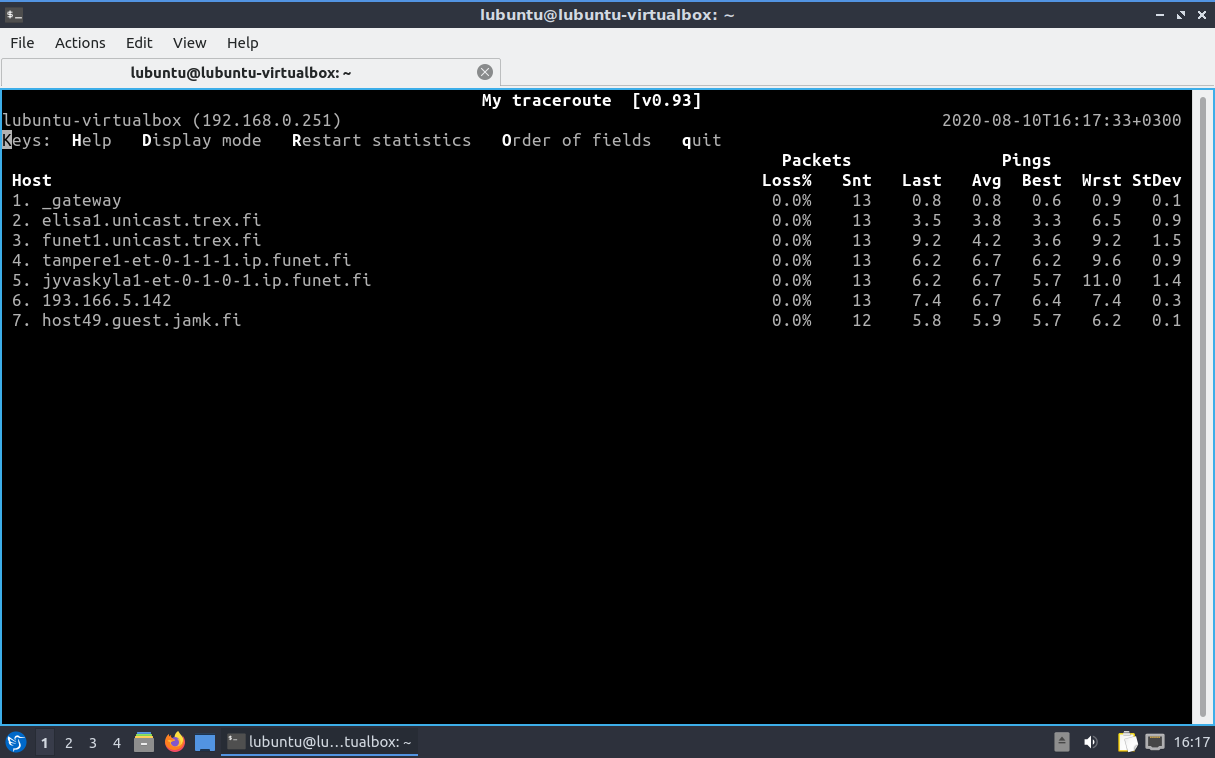
MTR (Mytraceroute) / pathping
The mtr in Linux and pathping in Windows are the interactive combination of ping and traceroute. They measure the delay to each hop as their own row.
lubuntu@lubuntu-VirtualBox:~$ mtr www.jamk.fi
Gives the following prompt (you can quit with CTRL+C)
Info: pathping is the equivelant in Windows 10
C:\Users\Kti>pathping www.jamk.fi
Tracing route to www.jamk.fi [195.148.129.49]
over a maximum of 30 hops:
  0  192.168.0.2
  1  192.168.0.1
  2  elisa1.unicast.trex.fi [195.140.192.18]
  3  funet1.unicast.trex.fi [195.140.192.17]
  4  tampere1-et-0-1-1-1.ip.funet.fi [86.50.255.218]
  5  jyvaskyla1-et-0-1-0-1.ip.funet.fi [86.50.255.161]
  6  193.166.5.142
  7  host49.guest.jamk.fi [195.148.129.49]

Computing statistics for 175 seconds...

            Source to Here   This Node/Link

Hop  RTT    Lost/Sent = Pct  Lost/Sent = Pct  Address
  0                                           192.168.0.2
                                0/ 100 =  0%   |
  1    0ms     0/ 100 =  0%     0/ 100 =  0%  192.168.0.1
                                0/ 100 =  0%   |
  2    3ms     0/ 100 =  0%     0/ 100 =  0%  elisa1.unicast.trex.fi [195.140.192.18]
                                0/ 100 =  0%   |
  3    9ms     0/ 100 =  0%     0/ 100 =  0%  funet1.unicast.trex.fi [195.140.192.17]
                                0/ 100 =  0%   |
  4    6ms     0/ 100 =  0%     0/ 100 =  0%  tampere1-et-0-1-1-1.ip.funet.fi [86.50.255.218]
                                0/ 100 =  0%   |
  5    7ms     0/ 100 =  0%     0/ 100 =  0%  jyvaskyla1-et-0-1-0-1.ip.funet.fi [86.50.255.161]
                                0/ 100 =  0%   |
  6    6ms     0/ 100 =  0%     0/ 100 =  0%  193.166.5.142
                                0/ 100 =  0%   |
  7    5ms     0/ 100 =  0%     0/ 100 =  0%  host49.guest.jamk.fi [195.148.129.49]
Assignment: Use mtr or pathping
On the virtual machine
- Do a
mtr www.jamk.fiand document the results. - Do a
mtr -n www.jamk.fiand document the results.
On the host computer
- Do a
pathping www.jamk.fiand document the results. - Do a
pathping -n www.jamk.fiand document the results.
Additional information on Ping and Traceroute
Quote: ICMP Ping and Traceroute - what I wish I was taught
It will contain concepts & terms that will come later on the course... but you can come back to this if necessary :)
Document the results
In the exercises repository:
- Use
/documentation/E01/-folder to hold the pictures. - Document your work in
E01.mdin markdown language.
All the assignments
Assignment: Take a screenshot of your virtual machines network settings
- Write down your MAC-address to
E01.md - Save the screenshot to
/documentation/E01/-folder in the repository- reference the picture file in
E01.md
- reference the picture file in
Info: Screenshot - use a screenshot software to capture the settings
e.g. in windows * Snipping Tool * Snip & Sketch
Save the image to /documentation/E01/ -folder of your repository and reference the file in E01.md with the text . Be precise with the file name & extension (.png or .PNG).
Question: Answer the following questions in your repository's E01.md
- What is this virtual machine useful for without a network connection? What can you do with it?
- Is there anypoint in computers without network connectivity?
- hint: Lookup what Alan Turing did without the Internet
Assignment: Please ping www.jamk.fi and document the results to E01.md
You can stop the ping with CTRL+C!
Assignment: Use Traceroute
- Do a
traceroute www.jamk.fiand document the results. - Do a
traceroute --resolve-hostnames www.jamk.fiand document the results.
Assignment: Use mtr or pathping
On the virtual machine
- Do a
mtr www.jamk.fiand document the results. - Do a
mtr -n www.jamk.fiand document the results.
On the host computer
- Do a
pathping www.jamk.fiand document the results. - Do a
pathping -n www.jamk.fiand document the results.
Back to the Schedule?
License
This course and its materials are written by Karo Saharinen and licenced by Attribution-NonCommercial-NoDerivatives 4.0 International (CC BY-NC-ND 4.0) license.
